

Posted by Jonathan Atan
on October 26, 2025

When you learn how to massage shin splints the right way, you’re not just chasing the pain—you’re getting ahead of it. The secret is to gently work the muscles around the shinbone, not the bone itself. This simple step helps ease tightness, supports circulation, and promotes your body's own recovery process.
This guide provides actionable steps and safety guidance to help you find relief.
Why Massage Is a Game Changer for Shin Splints
If you lead an active life, the sharp, nagging pain of shin splints can stop you in your tracks. This pain, also known as medial tibial stress syndrome, signals that the muscles and tissues around your shinbone are overworked. It's a major roadblock that keeps you from running, hiking, or just enjoying your day.
Targeted massage is so effective because it gets right to the source of that tension. By carefully massaging the lower leg muscles—especially the tibialis anterior (the muscle running alongside your shin)—you unlock a whole host of benefits that support recovery.
The Science of Relief
The logic is simple: massage boosts blood flow. That increased circulation is a big deal for a few key reasons:
- It delivers nutrients: Fresh, oxygen-rich blood rushes to tired tissues, giving them what they need to repair.
- It clears out waste: Massage helps flush out metabolic byproducts that build up in sore muscles, which can cause lingering aches.
- It releases tension: You physically break up knots in the calf and shin muscles, which stops them from constantly pulling on the shinbone.
Many people find that using a tool like a percussion massager takes this to the next level. Exploring the benefits of using a massage gun shows how this technology can provide deeper relief than you might get with hands alone.
"I started using gentle massage on my shins after my evening runs, and the difference was incredible. The persistent ache started to fade within a week." - A customer from Los Angeles, CA
Research from places like the Breeze Academy backs this up. Studies show that techniques like sports massage can speed up recovery by targeting muscle tension and improving circulation right where you need it. It’s an active step toward real relief.
Setting Yourself Up for a Safe Massage
Before you start the massage, a little prep work goes a long way. The goal is to get the muscle tissue ready, so you get all the benefits without making things worse.
First, do a quick pain check. If the pain is sharp or stabbing, it’s best to back off for now. That level of pain often signals serious inflammation, and you’ll want to check in with a healthcare professional before trying self-massage.
Prepare the Area
For that more typical, dull ache, warmth is your best friend. Grab a heated towel and wrap it around your lower leg for about 5-10 minutes. This simple step helps relax your calf and shin muscles, boosting blood flow and making them much more receptive to the massage.
Once you're warmed up, get comfortable. Find a spot where you can easily reach your entire lower leg without straining.
The most effective massage starts with smart preparation. Warming up the muscles first helps prevent injury and improves results.
Have your tools ready. This might be a bit of lotion, a foam roller, or a percussion massager like the Cryotex Massage Gun. Having everything in place first means you can stay focused on giving those overworked muscles the gentle relief they need.
Your Guide to Effective Self-Massage Techniques
Ready to get hands-on? Let’s walk through the techniques that can bring real relief. Think of this as a guided practice to show you how to massage shin splints safely and effectively.
Start by using your palm to make long, gentle strokes up and down your lower leg. This technique, called effleurage, increases blood flow and gets the muscle tissue warmed up. Spend a minute or two doing this on both the front and back of your leg.
Targeting the Tibialis Anterior
Once the area is warm, you can zero in on the main culprit: the tibialis anterior. This is the fleshy muscle running right alongside your shinbone.
Using your thumbs, apply firm, steady pressure into this muscle. Move slowly from just above the ankle towards the knee. When you find a tender spot, pause there for a few seconds. The most important safety rule is to always work on the muscle, never directly on the shinbone itself.
This quick infographic breaks down the simple prep steps to take before you start any massage.
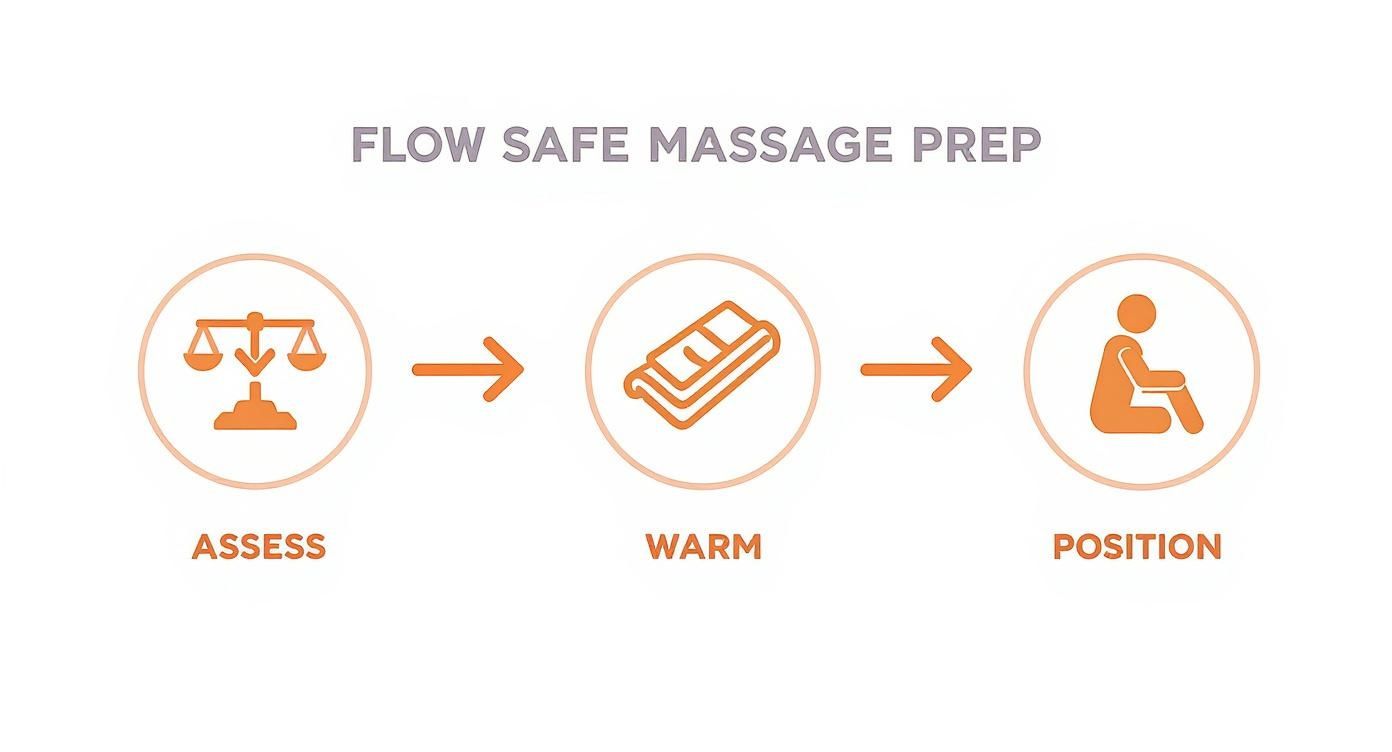
Following this sequence—checking your pain level, warming up the muscle, and getting comfortable—is the key to making your massage both safe and successful.
Incorporating a Massage Gun
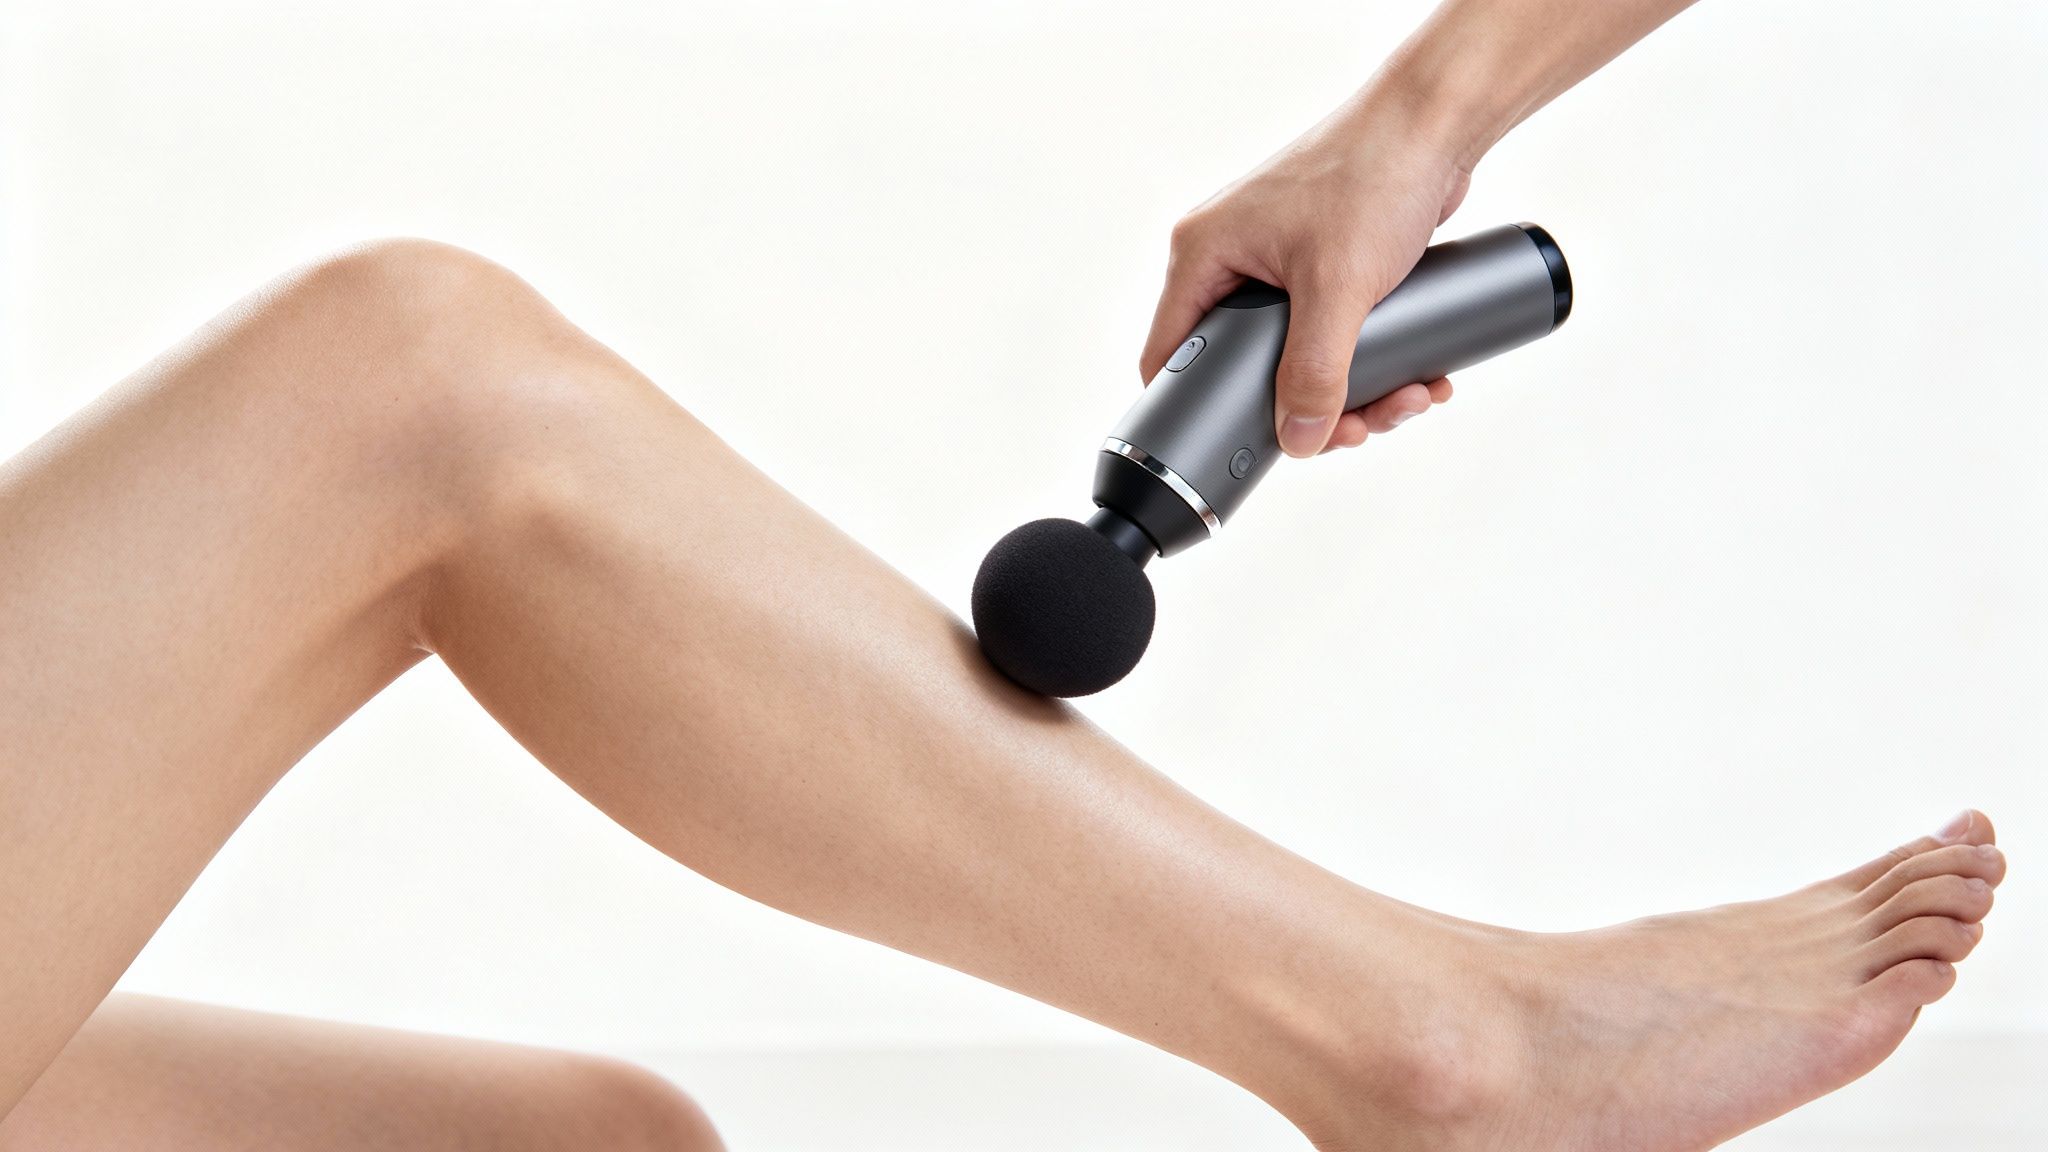
A percussion massager can be a game-changer for this, but you have to start gently.
- Attachment: Grab the softest head, like the round foam or cushion attachment.
- Speed: Start on the lowest speed setting. You can increase it later if it feels okay, but low and slow is the way to go for this sensitive area.
- Motion: Let the Cryotex Massage Gun glide over your calf muscles and the tibialis anterior. Don't add extra pressure—let the percussion do the work.
Remember to keep the device moving and spend about 30-60 seconds on each muscle group. The goal is to release tightness, not punish the muscle. The most important thing is to listen to your body.
"I used to just push as hard as I could, thinking that’s what worked. Learning to start gently and focus on the muscle next to the bone, not on it, made all the difference." - A customer from New York, NY
Your lower leg muscles are all connected, and a tight calf is often a major contributor to shin pain. Check out our guide on how to massage calf muscles properly for a more complete approach.
Digging Deeper with Advanced Tools
Once you've mastered the basics of self-massage, you can bring out the bigger guns for stubborn knots. This is where a quality percussion massager, like a massage gun, truly changes the game.
These tools are perfect for targeted techniques like trigger point therapy. Just be sure to wait until the initial sharp pain from your shin splints has settled down before you start.
Zeroing In on Knots and Adhesions
To practice trigger point therapy, switch to a more precise attachment, like a bullet head. Gently probe the tibialis anterior muscle to find a specific tight spot. Once you find it, apply steady, gentle pressure for about 30-60 seconds. You're looking for that satisfying feeling as the knot slowly gives way.
Another great technique is cross-fiber friction. For this, move the massage gun in short, deliberate strokes across the muscle fibers, not along them. This helps break down adhesions and restore healthy movement.
“When I learned how to use the different heads on my massage gun, it was a game-changer. The bullet attachment helped me finally release a knot in my shin muscle that had been bothering me for weeks.” - A customer from Chicago, IL
Figuring out which attachment does what is key to getting real results. You can find a complete breakdown in our massage gun attachment guide. The variable speed settings on the Cryotex Massage Gun are also incredibly useful. They allow you to start with a gentle setting and gradually increase the intensity, so you get deep relief without pushing too far.
Common Massage Mistakes and How to Avoid Them
Knowing the right massage techniques is one thing, but knowing what not to do is just as critical for a safe recovery. A few common mistakes can easily undo your hard work or even make things worse.
The number one rule is simple: never massage directly on the shinbone. Your tibia is already stressed. Pressing on it will only aggravate the issue. Always focus on the fleshy muscle that runs alongside the bone—that’s where the tension lives.
Don't Ignore What Your Body Is Telling You
Pain is your body’s alarm system, so it’s time to start listening. A dull, sore feeling can be productive, but sharp or intense pain is a clear signal to stop. Pushing through that kind of pain sets your healing back.
Another major red flag is visible swelling or redness. If your shin area looks puffy and angry, put the massage gun down. Grab an ice pack instead and apply it for about 15 minutes to help calm the inflammation.
"I thought more pressure was better, but I ended up with bruises. Learning to back off and avoid the bone itself was when I finally started feeling relief instead of more pain." - A customer from Los Angeles, CA
Other common slip-ups include cranking a massage gun to its highest setting right away or staying on one spot for too long. Keep it moving and limit the massage to 1-2 minutes per muscle group to avoid overdoing it.
Building a Complete Shin Splint Recovery Plan
Learning how to massage shin splints is a great first step, but it’s just one piece of the puzzle. For lasting relief, you need a complete toolkit: massage, rest, stretching, and strengthening.
First, you have to give it a rest. This is non-negotiable. Rest gives the inflamed tissues along your shin the downtime they need to repair. Pushing through the pain only drags out your recovery time.

Stretching and Strengthening
Once you’ve committed to rest, add targeted stretching. Focus on gentle stretches for your calves and the tibialis anterior. This helps release built-up tightness and improve flexibility.
After the sharp pain starts to fade, you can begin simple strengthening exercises. This is your proactive defense. Building up the muscles in your lower legs makes them more resilient, so they can handle the stress that caused the shin splints in the first place.
A consistent, well-rounded routine is your best defense. Each element supports the others, creating a stronger foundation for recovery.
Consistency is the secret sauce here. One study found that people with medial tibial stress syndrome who got consistent massage therapy for four weeks reported a major drop in pain. This shows how powerful regular massage is when it's part of a bigger plan. Read more about the study's findings on massage and pain relief.
Your Complete Shin Splint Recovery Toolkit
Here’s a breakdown of how all these pieces fit together. Think of this as your roadmap to getting back on your feet.
| Recovery Component | Primary Role in Healing | Frequency |
|---|---|---|
| Rest & Ice | Reduces initial inflammation and allows tissue to repair. | Daily, especially after any activity. |
| Self-Massage | Helps release muscle knots, supports blood flow, and breaks up adhesions. | 3-5 times per week, focusing on tight spots. |
| Stretching | Increases flexibility in calf and shin muscles to reduce strain. | Daily, especially before and after activity. |
| Strengthening | Builds muscle endurance to prevent future flare-ups. | 2-3 times per week, once acute pain is gone. |
By combining your self-massage routine—whether with your hands or the Cryotex Massage Gun—with these other core components, you’re not just addressing symptoms. You're building a powerful, long-term strategy for a full recovery.
Your Shin Splint Massage Questions, Answered
When you're trying to figure out the right way to massage your shin splints, a few key questions always come up. Here are simple, direct answers to help you recover safely.
How Often Should I Be Massaging My Shins?
Consistency without overdoing it is the goal. For a gentle hand massage, 5–10 minutes each day is a great target. This is usually enough to support circulation and ease tightness without causing more irritation.
For a powerful tool like the Cryotex Massage Gun, less is more. Start with just 2–3 minutes every other day. This gives your muscles a chance to respond. If you feel more sore after a session, that's a sign to pull back and take an extra day off.
Ice or Heat? Which One Is Right for Shin Splints?
This depends on when you use it. Timing is everything.
- Ice: Use an ice pack for 15 minutes at a time, especially within the first 24–48 hours after an activity that triggered the pain. It’s the best way to help calm that initial, angry inflammation.
- Heat: Apply a warm towel for 10 minutes before you start your massage. This helps relax tight muscles, making them more receptive to the massage. Never apply heat to a new, swollen injury.
Can a Massage Gun Make My Shin Splints Worse?
Yes, if you use it the wrong way. A massage gun is a powerful recovery tool, but it demands respect.
The biggest mistakes are aiming it directly onto the shin bone, using it on areas with sharp pain, or cranking it up to the highest setting right away. Any of these can easily flare up inflammation.
Start smart. Always use the lowest speed setting and the softest attachment head. Focus only on the fleshy part of your calf muscle and the muscle alongside the shin bone. If you feel any increase in pain, stop immediately.
Think of it this way: your body's pain signals are your guide. Listen to them, and a massage gun can be one of the best allies in your recovery toolkit.
At BestMassageGun.com, our mission is to empower you with the knowledge and tools for a smarter, faster recovery.
Shop the Cryotex Massage Gun — and Get Back to Doing What You Love